
You've got the footage, the photo, or the product shot, and now you need a face swap that doesn't look like a rough cut pasted on top of someone else's head. That's the job in 2026. How to swap faces is less about a single effect and more about picking the right production path, because a still image, a short clip, and a recurring social format all break in different ways.
What Face Swapping Actually Means in 2026
Face swapping used to mean tedious manual editing, then it became a public AI phenomenon in 2017 with GANs and autoencoders, and then open-source workflows spread for pre-recorded video in 2017 to 2018 before moving into real-time GPU pipelines and cloud live-swap products in the 2020s. That timeline matters because it shows why the old Photoshop-only mindset doesn't fit the current tools anymore, and why the technical barrier has dropped fast enough for non-specialists to use it in everyday content production. The milestone timeline shows the shift clearly.
A useful way to think about the task is as three different outputs. A meme-style swap can be rough and still work if the joke lands. A creator-grade swap needs believable skin tone, eye alignment, and clean edges. A full character replacement is closer to an AI performance change, where the face has to stay stable across motion and scene changes.
Smartphone AR also changed expectations before many realized it. Snapchat added face filters in 2015, and references note that Snapchat's face-swapping features reached users by 2016, which helped normalize facial augmentation for mass audiences. If you're comparing tools, a practical overview like top AI tools for creators helps place face swap inside a broader content stack instead of treating it like a one-off trick.
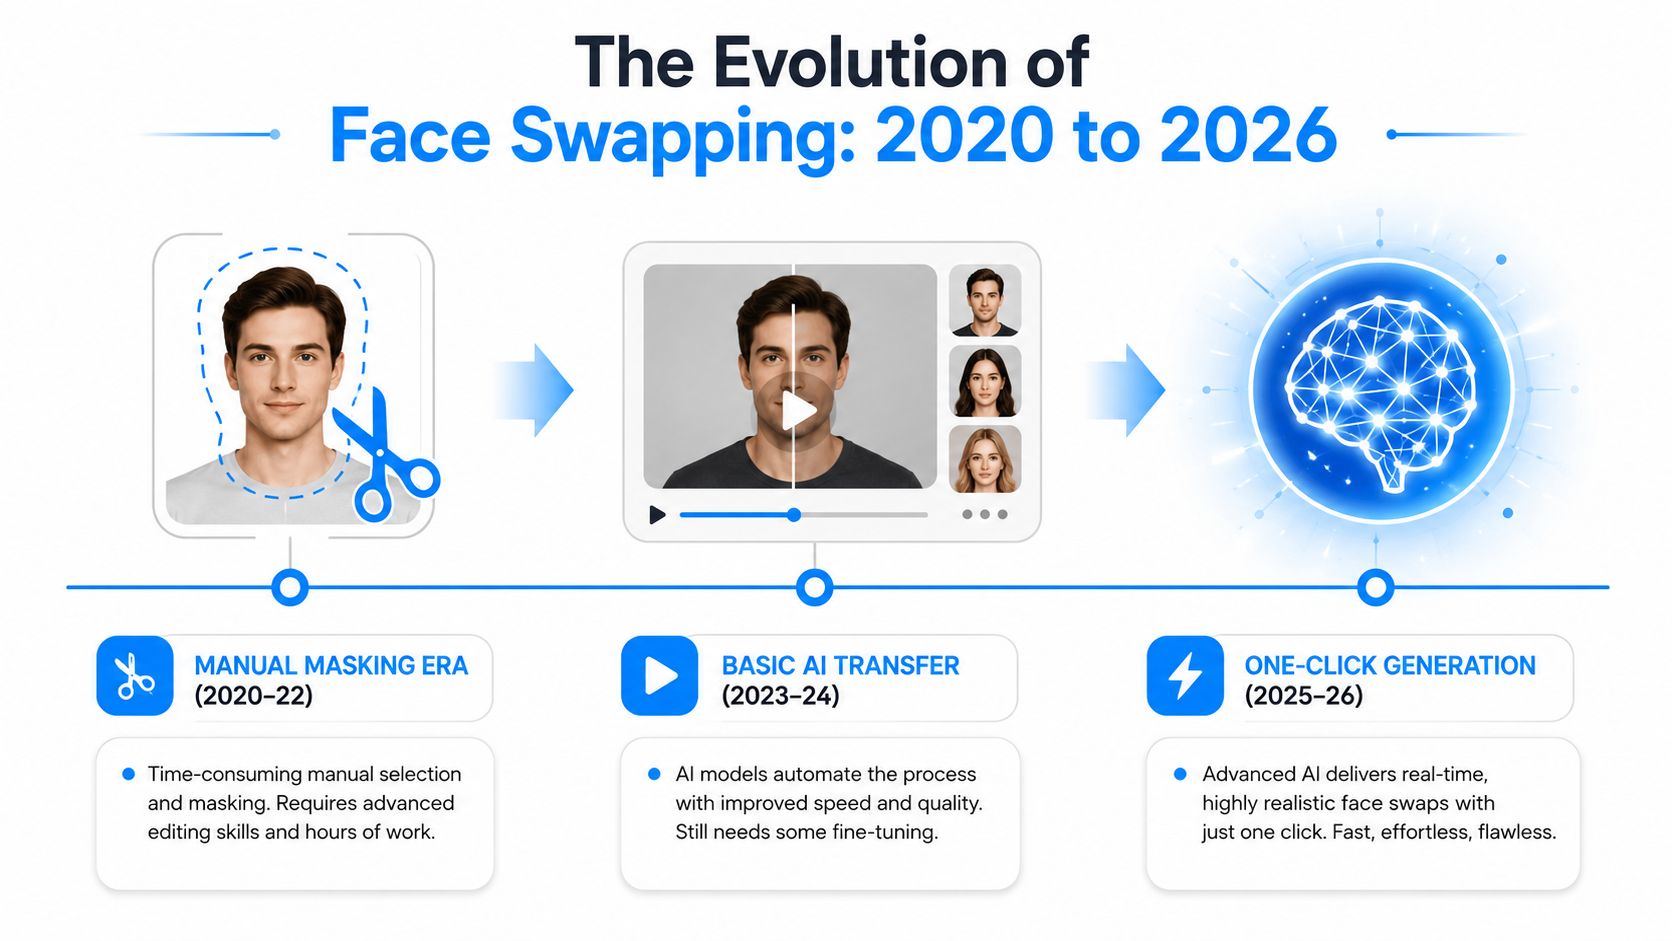
For creators, the big decision is simple. If you want a clean still, use a precision workflow. If you want a social clip, use a workflow that cares more about motion stability than about pixel-level perfection. Aicut's own face-swap workflow sits in that second camp, and its overview of face swap AI online is a good example of how these tools now package alignment, generation, and export into one pass.
Prepare Your Source and Target Assets
The final result usually fails long before any model starts generating. Bad source photos, mismatched angles, and ugly lighting are what make a swap feel wrong, even when the tool itself is doing its job. The cleanest results still come from geometry matching, where the eye line, jawline, and head angle line up before the swap happens. Adobe's official guidance recommends placing the face, lowering opacity to about 50%, and using Auto-Align before masking, because the alignment step reduces the correction work afterward. Adobe's face swap guide spells out that approach.
What to choose and what to reject
Use a source face with a neutral expression, even lighting, and sharp focus. A strong target scene should be close in head angle, brightness, and resolution, because the swap has to inherit the scene's perspective, not fight it. Adobe's public guidance for face swapping also leans on masking, opacity tuning, and color matching after placement, which only works well when the faces are already roughly compatible. Adobe's other face swap guide reinforces that clean starting assets matter.
Reject assets with sunglasses, heavy occlusions, hard shadows across the face, or extreme pose mismatch. Those are the setups that turn a quick edit into a rescue job. If a face is partly hidden by hair or a hand, you're not doing a swap, you're trying to reconstruct missing visual information.
Practical rule: if you can't line up the eyes, nose bridge, and jawline in a quick overlay, the asset pair probably isn't worth forcing.
A fast pre-flight check takes under a minute:
- Forward-facing enough: The head shouldn't be turning so far that one side of the face disappears.
- Eyes open and visible: Closed eyes make alignment less reliable.
- No strong filters: Beauty filters and heavy stylization confuse identity matching.
- Similar lighting tone: Warm source to cool target usually looks off.
- Enough resolution: If the face is tiny in the frame, the swap will get mushy when reframed.
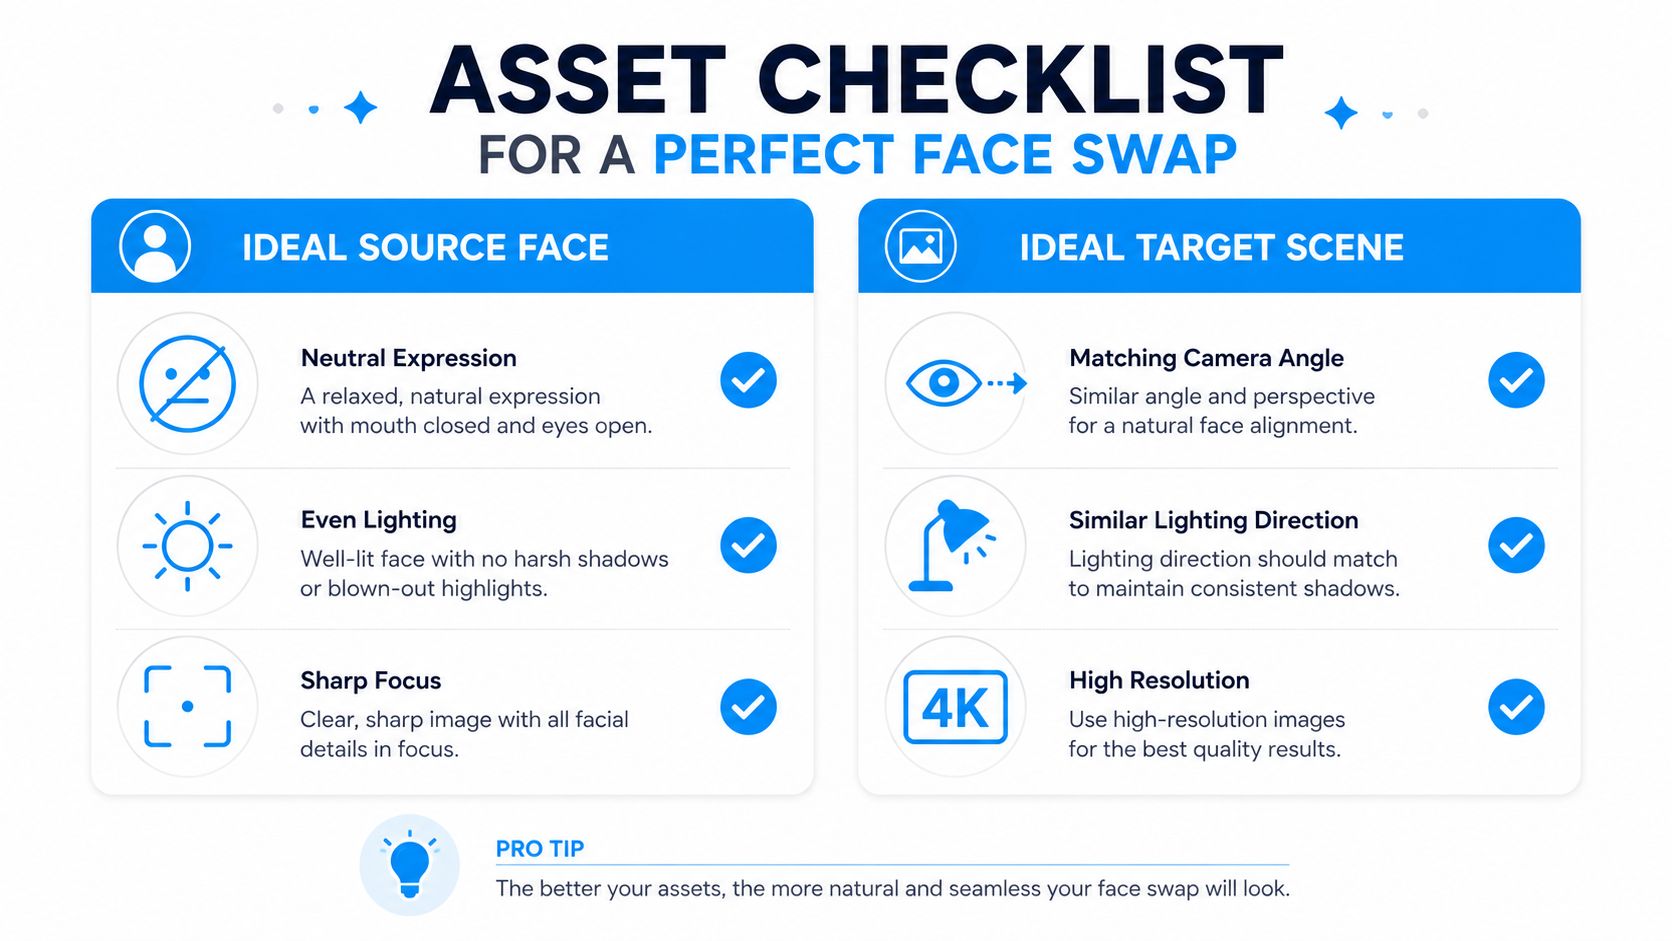
A quick shortcut is to compare the source and target at thumbnail size first. If the match feels plausible there, you've got a decent shot at a believable result. If not, change the assets before you touch the tool, because no model likes being asked to solve a bad input pair.
Pick the Right Workflow for Images Versus Video
People often ask how to swap faces as if there's one universal process. There isn't. A still image rewards careful alignment and manual polish, while video rewards consistency from frame to frame. That distinction matters more than the brand name of the tool.
Choose the workflow by the deliverable
If the output is a single post, thumbnail, or ad still, prioritize precision. That means alignment, masks, color correction, and edge cleanup. If the output is a short clip, prioritize stability, because a face that looks fine in one frame can drift, jitter, or flatten in the next one.
| Factor | Image Swap | Video Swap |
|---|---|---|
| Main goal | Clean final frame | Stable identity across frames |
| Best strength | Detailed retouching | Motion consistency |
| Common failure | Obvious edge seams | Identity drift and jitter |
| Editing style | Mask, blend, color grade | Lock prompt, tune motion, review frame behavior |
| When it works best | Thumbnails, posters, still ads | Shorts, reels, UGC-style clips |
The image path is slower, but it gives you more control over skin tone, shadows, and fine edges. The video path is faster for creators who need a publishable clip, but you pay for that speed by babysitting motion quality. If you want a deeper look at animated source material, how to animate a photo is useful because it shows how a still becomes motion before a face swap ever enters the picture.
For clip work, choose tools that keep the face coherent as the camera or subject moves. That's why templates and built-in swap flows matter more than a fancy editor. Aicut's edit faces in videos workflow fits this use case because it's built around short-form delivery, not around manually fixing every frame.
My rule of thumb: if the deliverable needs to survive a scroll feed, don't optimize for perfection in one frame. Optimize for consistency across the whole clip.
Run the Swap Step by Step in Aicut
A practical face swap workflow starts by choosing a template that matches the final post format. For short-form content, that usually means a vertical layout where the subject stays readable on a phone screen. In Aicut, that means starting from a creator template, then uploading or generating the base character before you touch the swap controls.
Use the editor in the order the tool expects
First, load the base video or image. Then choose the character-swap path if the face itself needs to change, or the background-swap path if the subject is fine and the scene is the problem. That distinction matters because many failed projects happen when people try to force one control to do both jobs.
Aicut also supports a model-based workflow, and the model choice should follow the job, not habit. Sora 2, Veo 3.1, and Kling make sense when you're working across different motion styles and output needs. Nano Banana is useful when you want a lighter image-oriented path, while Grok Imagine is the quicker option for image swaps. The point isn't to chase every model, it's to match the model to the clip length, the edit speed, and the budget you want to spend.
Once the swap is triggered, inspect the first pass before you export. Look at the jawline, the eyes, and any place the face meets hair or clothing. If the platform gives you a simple character swap and a background swap, keep those jobs separate. That separation usually produces fewer artifacts than trying to solve everything in one generation pass.
If the result holds up, send it straight to export and scheduling. For short-form creators, publish-ready beats pixel-perfect every time, because a clip that lands on time is worth more than a clip you keep polishing until it never ships.
Quality Tips That Make Swaps Look Believable
A good swap disappears into the frame. A bad swap announces itself at the jawline, around the hair, or in the eyes. The difference usually comes down to whether you matched the scene, not whether you used the latest model.
Fix the parts viewers notice first
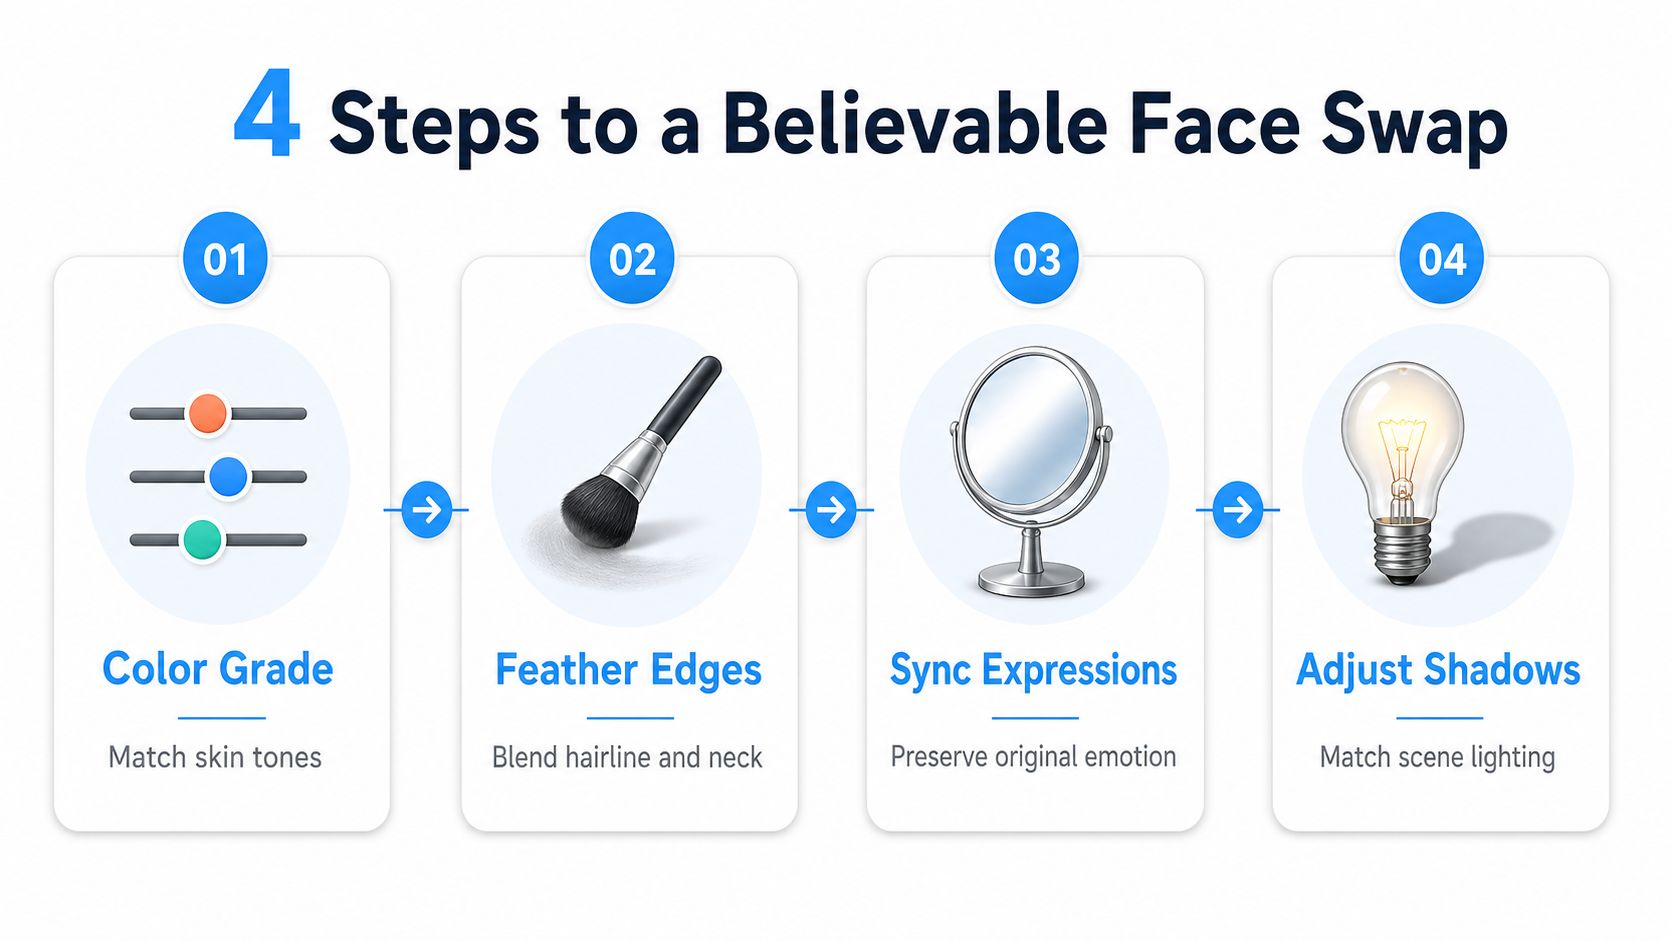
Start with color grading so the skin tone doesn't fight the surrounding lighting. Then feather the edges around the hairline and neck, because hard borders are what give away a cut-and-paste edit. Keep the catchlights and eye shape as close as possible to the original, since viewers lock onto the eyes faster than they do to the cheeks or forehead.
For video, consistency matters more than a single perfect frame. Use stable lighting cues in the prompt, keep the camera language fixed, and avoid piling on conflicting style words that change the identity from one reroll to the next. When a render is close, I've found that rerolling the same setup can be more useful than making tiny prompt edits that pull the face in different directions.
Know when it's good enough
A clip is ready when the face reads naturally at normal viewing size, the neck blends cleanly, and the expression still feels like the subject. If the skin tone looks right but the jawline screams “edited,” keep working. If the face is stable, the shadows line up, and nothing jumps during motion, you're done.
A short checklist helps:
- Skin tone matches the scene
- Hairline and neck are blended
- Eyes still feel alive
- No sharp border at the swap edge
- Motion doesn't create a second face
That's the point where most creators should stop. Further tweaking usually buys tiny gains and creates new artifacts somewhere else.
Troubleshoot the Problems You Will Actually Hit
Most face swaps fail in familiar ways, and the fix is usually narrower than people expect. The common mistake is to restart the whole project when one setting, one crop, or one mask choice would have solved the issue. Treat the result like a production problem and diagnose it directly.
Quick diagnosis table
| Problem | What it usually means | Practical fix |
|---|---|---|
| Face appears to turn into a different person | Identity drift across frames | Use more consistent source photos and lock the prompt language |
| Blurry jawline edges | Mask is too soft or the crop is too loose | Tighten the crop and reduce feathering |
| Skin color looks unnatural | Source and scene lighting clash | Run a color match pass before generation |
| Face shakes on movement | Motion isn't stabilized | Keep the camera language stable and use a more controlled clip |
| Object blocks face | Occlusion is confusing the swap | Split the clip or create custom occlusion handling |
Hands, glasses, hair, and microphone props are the most annoying blockers because they cut across the face in ways the model has to guess around. If the face is repeatedly covered, don't force one continuous swap through the whole shot. Split the clip by scene or by pose, then swap each segment separately.
The fastest fix is often a simpler shot, not a smarter model.
If the identity keeps sliding, the problem is usually input consistency, not generation quality. Use a narrower crop, a cleaner source face, and a more controlled prompt. If the issue shows up only when the head turns, the clip probably needs a more stable movement setup, or the swap needs to be limited to the parts of the video where the face stays clear.
One more practical test
Pause the render at the worst frame and compare it with the original. If the mismatch is in lighting, fix lighting. If it's in shape, fix alignment. If it's in motion, reduce the complexity of the shot. That single frame usually tells you where the pipeline broke.
Ethics, Consent, and Platform Rules Before You Publish
A face swap that looks convincing can still be a bad publish. If you're using someone else's likeness, consent is the first gate, whether that person is a public figure or someone in your own camera roll. A believable edit can mislead fast, and misleading content can cross from playful into harmful before anyone notices.
Prefer faces you own, characters the tool provides, or assets you have explicit permission to use. If the platform expects disclosure, add it clearly in the caption or tag so the viewer isn't guessing. Don't publish swaps that could impersonate, defame, or trick someone into believing a real person said or did something they didn't.
These defaults protect you too. Swaps that age badly usually age badly because they were built on weak consent and sloppy context, not because the visuals weren't sharp enough.
Aicut gives you a face-swap workflow, character swaps, background swaps, and short-form templates in one place, so you can build a clip without stitching together five separate tools. If you're shipping social content and want the edit path to stay fast, visit Aicut and try the workflow on a real project instead of a test render.