
You're probably trying to do one of three things right now. Add a logo animation over your reel without a white box. Drop a character cutout into a meme edit. Or make a clean motion graphic sit on top of footage without looking cheap.
That's where a transparent background for video matters. Once you understand how transparency works, you can build overlays that look native to TikTok, Instagram, YouTube Shorts, and paid social. You also stop wasting time exporting files that come back with a black background, broken edges, or weird halos.
Why Transparent Video is a Game Changer
Short-form creators use transparent video because it solves a basic visual problem. You want only the moving element, not the rectangle around it.
A reaction sticker, animated caption effect, product callout, floating avatar, subscribe animation, and fake text-message pop-up all work better when they sit cleanly over the main clip. That's what makes edits feel layered instead of flat.
The technical piece behind this is the alpha channel. Think of it as the part of the file that tells your editor which pixels should be visible and which should be invisible. Without it, your video has to fill the frame with some color. With it, the empty areas stay transparent.
Why creators rely on it so much
This isn't some advanced niche workflow anymore. Most video editing software includes dedicated chroma key filters, and by 2025 over 90% of stock video platforms hosted extensive green screen footage libraries, while premium services offered thousands of transparent alpha channel videos that skip keying altogether, according to this VideoEditing discussion on Reddit.
That matters because modern social content moves fast. You don't always have time to build every effect from zero.
Practical rule: If the overlay needs to be reused across multiple posts, make it transparent once and keep it as a reusable asset.
What changes in your workflow
Once you start using transparent assets, a lot of edits become faster:
- Branding gets cleaner because logos, badges, and lower thirds can float over footage
- Meme formats get easier since you can place characters or effects anywhere in frame
- Templates become reusable because one overlay can work across multiple hooks, products, or trends
For social video, that speed matters as much as polish. The best workflow is usually the one that gets a good-looking result without turning a 20-second reel into an all-day edit.
Creating Transparency From Scratch
You shoot a quick talking-head clip for TikTok, drop it over gameplay, and the edges look rough around the hair. That usually comes down to the removal method you picked before you ever started editing.
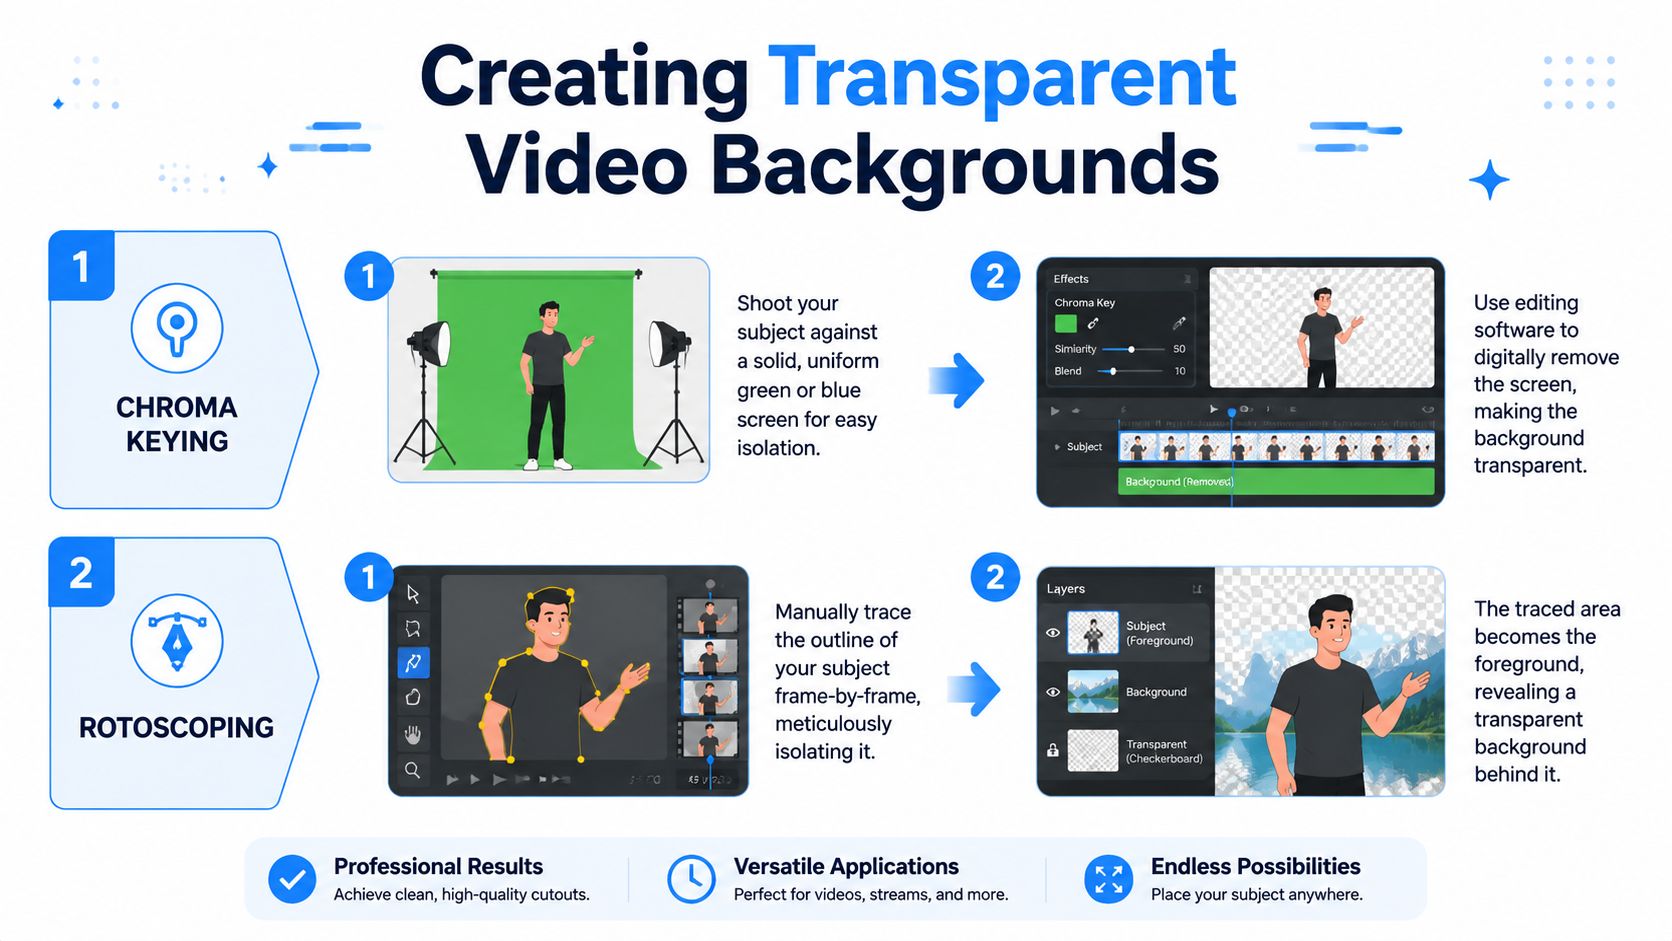
For social creators, there are really two practical options. Shoot against a green screen and key it out later, or use AI removal on normal footage. Both can work well. The faster choice is not always the one that holds up once you add motion, captions, stickers, and compression from TikTok or Instagram.
Green screen when you control the shoot
Green screen still gives the cleanest repeatable result if you can set up the shot properly. Put the subject in front of an evenly lit background, leave space between the subject and the screen, and remove the green with a chroma key in your editor.
This is the method I trust for reusable assets. Brand intros, hand-driven product demos, reaction cutouts, and presenter overlays usually look better with a keyed green screen than with one-click AI removal. You get cleaner edges, better consistency across clips, and fewer surprises when the subject moves fast.
The catch is production discipline. Bad lighting creates blotchy keys. Green spill shows up on skin, glasses, and hair. A weak setup can easily waste more time in post than it saved during the shoot.
What usually works
- Keep distance from the screen: More separation reduces green spill on edges
- Light the background first: A flat green plate keys faster than a bright subject on a patchy screen
- Watch wardrobe and props: Green fabric, reflective surfaces, and translucent objects create cleanup work
- Check a test key before filming the full batch: It is faster to fix lighting now than roto frames later
Green screen pays off when you batch content and want the same clean cutout style across multiple posts.
AI removal when speed matters more
AI background removal is usually the faster route for short-form creators working from existing footage, phone clips, or UGC-style ads. Instead of building a proper set, you drop in the clip, let the tool isolate the subject, and check whether the edges hold up well enough for the platform.
That trade-off matters. AI is great for quick hooks, meme edits, faceless content, and one-off overlays that only need to survive 15 to 30 seconds on a social feed. It is less reliable with fine hair, motion blur, fast hand movements, shadows, low contrast clothing, or busy backgrounds.
For a fast test workflow, this guide to a free video background remover for video clips is a good place to see whether AI output is clean enough before you spend time in Premiere or Resolve.
How I choose for TikTok and Instagram
For TikTok, speed usually wins. If the clip is trend-based and has a short shelf life, AI removal is often good enough, especially after you add text, zooms, and aggressive platform compression.
For Instagram Reels ads or branded creator content, I lean green screen more often. The cleaner edges hold up better on product shots and polished overlays, and you avoid the flicker that AI masks sometimes introduce around hands and hair.
Use green screen if:
- You can control lighting and framing
- You need repeatable assets for multiple edits
- The subject moves a lot or has detailed edges
Use AI if:
- You are repurposing footage you already have
- You need a fast result on a phone or laptop
- The clip is short, simple, and not worth a full keyed setup
The best workflow is the one that matches the lifespan of the content. For disposable trend clips, fast usually beats perfect. For branded overlays you plan to reuse, build it clean once and keep the asset.
Exporting Videos With an Alpha Channel
You finish a clean cutout, export it, drag it into a new edit, and get a black rectangle. That usually means the mask was fine, but the export settings stripped the transparency.
The fix is simple once you know where creators lose it. MP4 is built for final delivery, not transparent assets. For TikTok and Instagram work, that matters because the transparent file is usually an ingredient in the edit, not the file you post.
Why MP4 usually fails
Transparency lives in the alpha channel. If your codec or export settings do not carry alpha, your editor fills the empty area with black, white, or whatever default it uses.
In practical terms, export with a codec that supports alpha, then turn on the alpha option itself. In Premiere Pro and After Effects, that often means ProRes 4444 or QuickTime Animation with RGB + Alpha selected. In Blender or more effects-heavy workflows, a PNG sequence is still one of the safest options because every frame keeps its own transparency.
A lot of wasted time comes from checking the render in the wrong app. Some media players ignore alpha and show a solid background even when the file exported correctly. Test the file in your editor, compositing app, or browser target before you assume it failed.
The formats that actually make sense
For editing overlays, ProRes 4444 is the reliable choice. It imports cleanly into Premiere Pro, After Effects, and Resolve, and it holds edge detail better than the quick workaround formats creators often try first. The trade-off is large file size, so it is best for source assets and reusable overlay packs, not casual file sharing.
For browser use, WebM with VP9 alpha is usually the better fit. YouTube's developer documentation for transparent WebM and alpha channel playback shows why creators still use it for web overlays. Chrome and Firefox handle it better than Safari, so fallback planning matters if the asset is meant to play on a website.
For frame-accurate composites, PNG sequences are still hard to beat. They take more storage and file management, but if you need to fix one broken frame or hand off the asset between apps, image sequences are still the cleanest insurance policy.
If you need a broader refresher before choosing export settings, this guide to the best video format for different platforms and workflows helps map the format to the actual destination.
Transparent Video Format Comparison
| Format | Best Use Case | File Size | Compatibility |
|---|---|---|---|
| ProRes 4444 | Editing overlays in Premiere Pro, After Effects, DaVinci Resolve | Large | Strong in pro editing workflows |
| WebM with VP9 alpha | Website overlays, browser playback, lightweight delivery | Smaller than ProRes in many cases | Strong on Chrome and Firefox, weaker on Safari without fallback |
| PNG sequence | Film, animation, frame-perfect compositing | Very heavy and split into many files | Flexible in advanced editing pipelines |
Export checks that save time
Use this quick check before you render:
- Pick a codec that supports alpha, such as ProRes 4444 or PNG sequence.
- Enable the alpha option. Look for RGB + Alpha, Straight Alpha, or Premultiplied Alpha depending on the app.
- Preview the file in the app that matters. An NLE, compositing app, or target browser is a better test than a default media player.
- Export for the job, not the habit. A reusable overlay asset, a website animation, and a finished Reel should not all leave your timeline in the same format.
One workflow note from short-form editing. For TikTok and Instagram, I rarely upload a transparent file directly because those platforms are built around flattened delivery. I export the transparent asset first, stack it over the base footage in the final edit, then post a normal H.264 or platform-ready file.
That approach also keeps the visual hierarchy tighter. If you are building overlays to support hooks, reactions, or product callouts, these effective visual storytelling tips are a useful reference for deciding what should stay on screen and what should disappear fast.
Using Transparent Overlays on Social Platforms
A Reel is almost finished, but the opening still feels flat on mobile. The fastest fix is often a transparent overlay that tells the viewer where to look before they scroll away.

On TikTok, that usually means a reaction cutout, comment bubble, or product pointer sitting above the main footage. On Instagram Reels, I see the best results from light motion graphics, feature labels, and small branded elements that support the demo instead of covering it. Shorts can use the same approach, but TikTok and Instagram are less forgiving if the overlay blocks captions or app UI.
TikTok and Instagram use cases that actually work
The "comment reply" format still works because it is easy to read fast. Drop a transparent speech bubble, emoji, or mini text card over the base clip and time it to the line that matters. Viewers get the point before they process the full caption.
The "floating expert" setup is another reliable option. Cut out the speaker, place that transparent clip over screen recordings or B-roll, and keep the face small enough that the main footage still does the heavy lifting. It feels more native to short-form than a full-screen talking head, and it gives you more room to swap backgrounds, demos, or proof shots without rebuilding the whole edit.
Stock libraries can save time here. Platforms like Shutterstock and Vecteezy offer thousands of transparent video assets, but social creators usually get better results by keeping those assets secondary. A flashy HUD, swipe effect, or particle burst should support the hook, not become the hook. If speed matters more than hand-building every layer, an AI video creator for short-form content can cut down the time spent bouncing between remover, editor, and asset library.
What makes overlays feel polished
Placement matters more than the overlay itself.
A clean transparent asset can still look amateur if it lands in the wrong part of the frame or stays on screen too long. TikTok and Instagram both reserve a lot of space for buttons, captions, usernames, and stickers, so the safe area is smaller than many creators expect.
That is why it helps to study effective visual storytelling tips before layering effects everywhere. Good overlays direct attention. Bad overlays split it.
A few habits improve results fast:
- Protect the mobile safe zones: keep overlays clear of caption space, right-side buttons, and bottom CTAs
- Sync motion to a reason: use a pop-in, wipe, or scale only when a spoken phrase, beat, or reveal justifies it
- Keep the hierarchy obvious: one overlay can guide attention, three usually create clutter
- Trim aggressively: if an overlay has done its job in half a second, remove it
Here's a useful example of the style in action:
A fast placement workflow
My quick test is simple. Stack the transparent asset above the base clip, resize for vertical framing, then watch the first three seconds with the sound off.
If the message still reads, keep it. If the overlay only makes sense once the voiceover explains it, it is probably too late, too busy, or unnecessary.
That speed-first approach is the main difference between traditional editing and social editing. Professional compositing workflows can spend a long time refining every edge. Short-form creators usually need a result that reads instantly, exports cleanly, and can be repeated across multiple posts without wasting an hour on one sticker.
The Aicut Shortcut for Flawless Background Swaps
Manual transparency workflows are useful, but they're also where a lot of creators lose momentum. Green screen requires setup. Keying needs cleanup. Export settings are easy to break.
That's why AI-first tools have become attractive for short-form production. Instead of treating background removal like a post-production task, they treat it as part of content generation.
Why this approach fits social creation
If you're making faceless videos, UGC-style clips, or fast trend spins, speed matters more than a cinema-grade pipeline. A tool like Aicut's AI video creator is designed around that reality.
Instead of juggling a separate remover, editor, and export workflow, creators can move faster with built-in background swaps, template-based production, and short-form oriented editing. That's especially useful when you're publishing variations, not just one hero video.
Where it helps most
This kind of workflow is strongest when:
- You publish often: repeated manual masking gets old quickly
- You repurpose trends: fast swaps matter more than perfect edge finesse
- You manage multiple channels: consistency beats tinkering
It's also useful if you're still comparing the broader field. If you want context on how different AI tools approach generation, editing, and creative control, this resource to compare AI generators, including Runway gives a practical overview.
The best shortcut isn't the one with the most features. It's the one that removes the most friction between idea and upload.
For social creators, that usually means reducing setup, avoiding technical export problems, and keeping the workflow close to the format you're publishing in.
Common Pitfalls That Ruin Transparency
Most transparency problems come from one of three places. Bad source footage, wrong export settings, or format mismatch at the final destination.
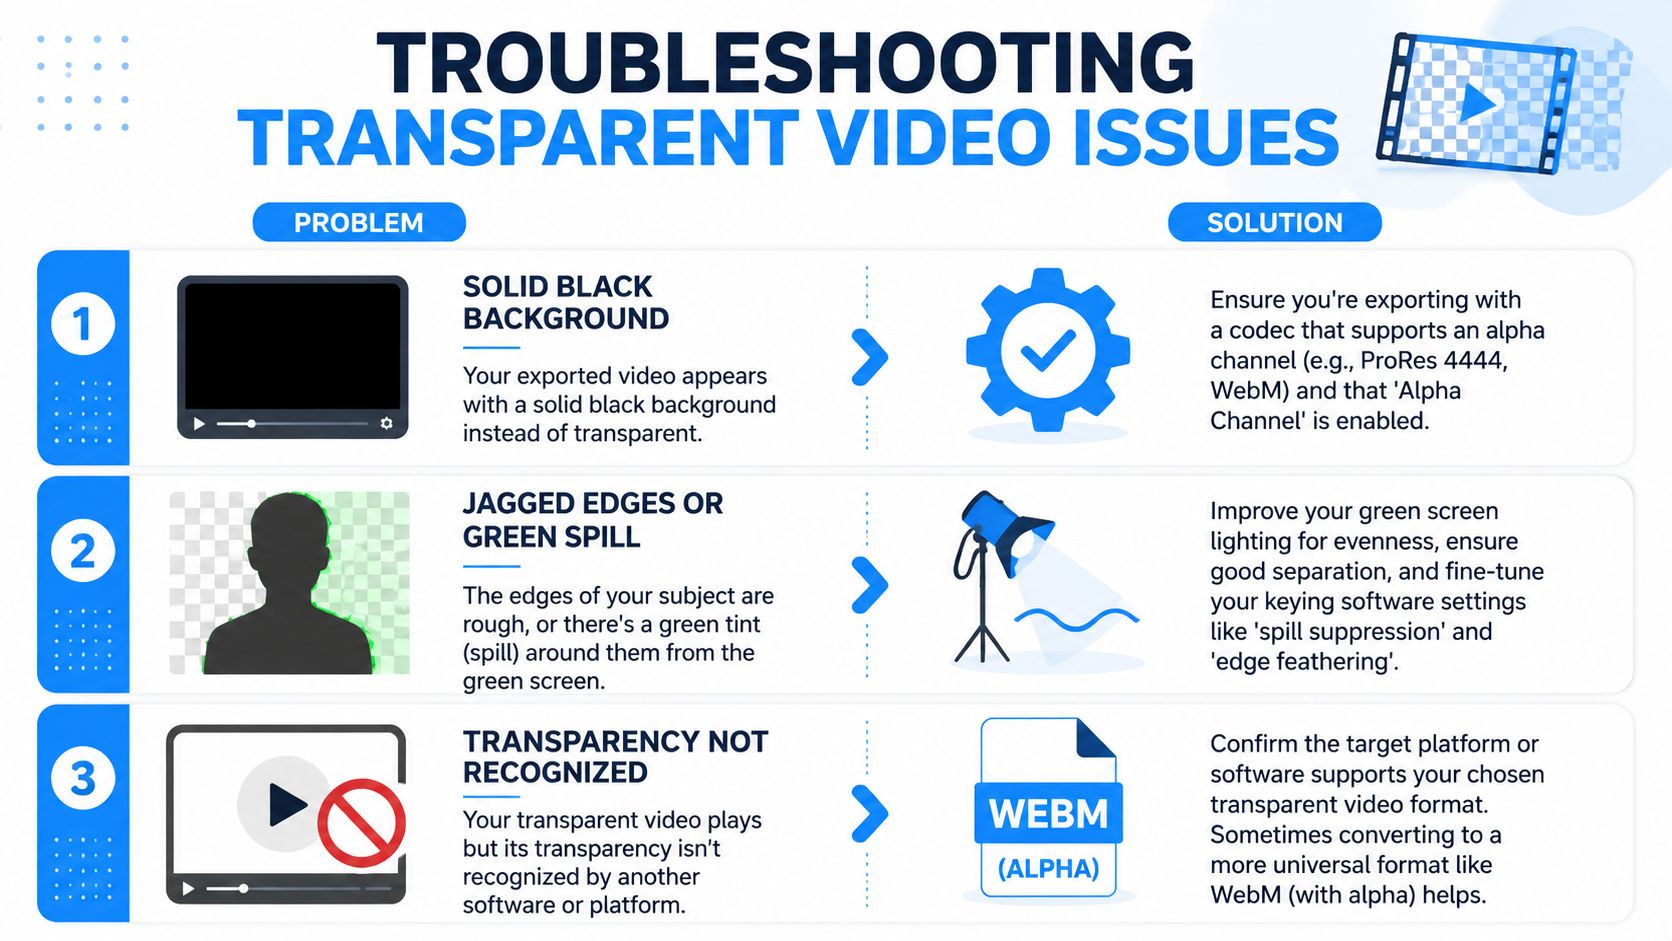
Black background after export
This usually means the file does not contain transparency. The background was removed in the timeline, but the export codec didn't preserve the alpha channel.
Fix it by reopening the export panel and checking that you chose an alpha-compatible format. Then test the file inside an editor, not just a media player.
Rough edges and ugly halos
This is usually a source problem, not an editing problem. Poor green screen lighting, low contrast, compression artifacts, and motion blur all make edges messy.
If you shot on green screen, clean up spill suppression and feathering. If you used AI removal, try a cleaner source clip with better separation between subject and background.
File is too heavy for the workflow
High-quality transparent video gets large fast. That's normal. Keep the master file for editing, then export the final combined social post in a delivery format suited to the platform.
Transparency works in one app but not another
Not every app handles alpha the same way. Some platforms ignore transparency completely. Others only support specific formats well.
Test the asset in the exact software and device flow you plan to use before building a whole batch around it.
A small test export saves a lot of frustration. Especially when you're making multiple reels or ads from the same source package.
Transparent Video Frequently Asked Questions
Why does my transparent video show a black background?
Usually because the export format didn't preserve the alpha channel, or because you're previewing the file in a player that doesn't display transparency properly. Check the file inside your editing software first.
Can I make an existing MP4 video transparent?
Yes, but not by changing the file extension or re-exporting the MP4 alone. You need to remove the background in an editor or AI tool, then export again in a format that supports transparency.
What's the easiest way to create a transparent background for video?
For speed, AI background removal is usually the easiest. For cleaner control, green screen still works well when the footage is shot properly.
What's the best format for editing transparent overlays?
For editing, ProRes 4444 is the common safe option because it supports alpha cleanly and works well in major editing tools.
Should I upload a transparent file directly to TikTok or Instagram?
Usually no. In most cases, you place the transparent asset over your main footage in your editor, then export the finished post as a standard social video.
What if hair or fast motion looks bad after background removal?
Try a cleaner source clip, improve contrast between subject and background, or switch from AI removal to a controlled green screen shoot. Hair, motion blur, and soft edges are the first things to break.
If you want a faster way to build short-form videos with background swaps, overlays, and viral-ready templates, try Aicut. It's built for creators who want to spend less time fighting edit settings and more time publishing.