
You've probably got a Reel open in your editor right now that looks clean on your timeline, then falls apart the second it hits Instagram. Text gets buried under the caption area. The cover looks fine in full view but awkward on the grid. A sharp export turns soft after upload.
That usually isn't a creativity problem. It's a format problem.
The Instagram Reels format is simple at the surface. Vertical video, full screen, fast pace. But the difference between a Reel that feels polished and one that feels slightly off usually comes down to a handful of technical choices: canvas size, frame rate, file container, safe zones, export settings, and how you package the cover and caption. Miss one, and Instagram starts making decisions for you.
Instagram Reels Format Quick Reference Sheet
Open your editor with the wrong project settings, and the cleanup starts immediately. You resize clips, shrink text, rebuild the cover, then watch Instagram compress the final upload anyway. This sheet is the version to keep beside your timeline so you can set the project correctly before you start cutting.
Instagram Reels Technical Specifications 2026
| Specification | Recommended Value |
|---|---|
| Aspect ratio | 9:16 |
| Resolution | 1080 × 1920 px |
| Orientation | Vertical |
| Recommended file type | MP4 |
| Also commonly supported | MOV |
| API-supported frame rate | 23–60 FPS |
| Practical frame rate choice | 30 FPS for most Reels, 60 FPS for smoother motion |
| Maximum published API width | 1920 pixels |
| Length at launch | 15 seconds |
| One independently reported current max | 3 minutes |
| API publishing range in one guide | 3 seconds to 15 minutes |
| Additional creator-discussion update | 20-minute Reels update in 2026 |
| Mobile viewing format | Full-screen vertical |
Use the table as a production baseline, not just a list of numbers. In practice, three settings cause the most avoidable problems: aspect ratio, resolution, and frame rate. Get those right at project setup, and you avoid a lot of late-stage fixes.
The safe default is still 9:16, 1080 × 1920, vertical export. That format matches how Reels are displayed in the app and gives Instagram less reason to resize or pad your footage. It also keeps your editing decisions honest. If the project starts in the final frame, you can judge text placement, crop choices, and motion with the actual viewing experience in mind.
Duration is less tidy. Different publishing methods, app updates, and third-party references often show different limits, so treat runtime rules as platform-dependent rather than universal. The practical takeaway is simple: check the current limit in the exact workflow you use, especially if you publish through a scheduler or API-based tool.
What to keep pinned above your timeline
- Start with a 9:16 project: Set the canvas to 1080 × 1920 before the first edit.
- Use MP4 unless you have a reason not to: It stays consistent across most editing and upload workflows.
- Match frame rate to the footage: 30 FPS works well for talking-head videos, explainers, and standard edits. 60 FPS usually holds motion better for action, product movement, and speed changes.
- Treat duration limits as variable: Confirm the cap in the app or publishing tool you use.
- Leave room for packaging decisions: A file can meet the spec and still look sloppy if the cover crops badly or text sits too low.
Practical rule: If you build the Reel in the final format from the start, you avoid the crop, cover, and compression mistakes that usually show up at export.
The Core Technical Specs Explained
A Reel can meet the published specs and still come out soft, jittery, or oddly cropped after upload. The difference is usually not the idea. It is the file setup.
Why 9:16 matters in practice
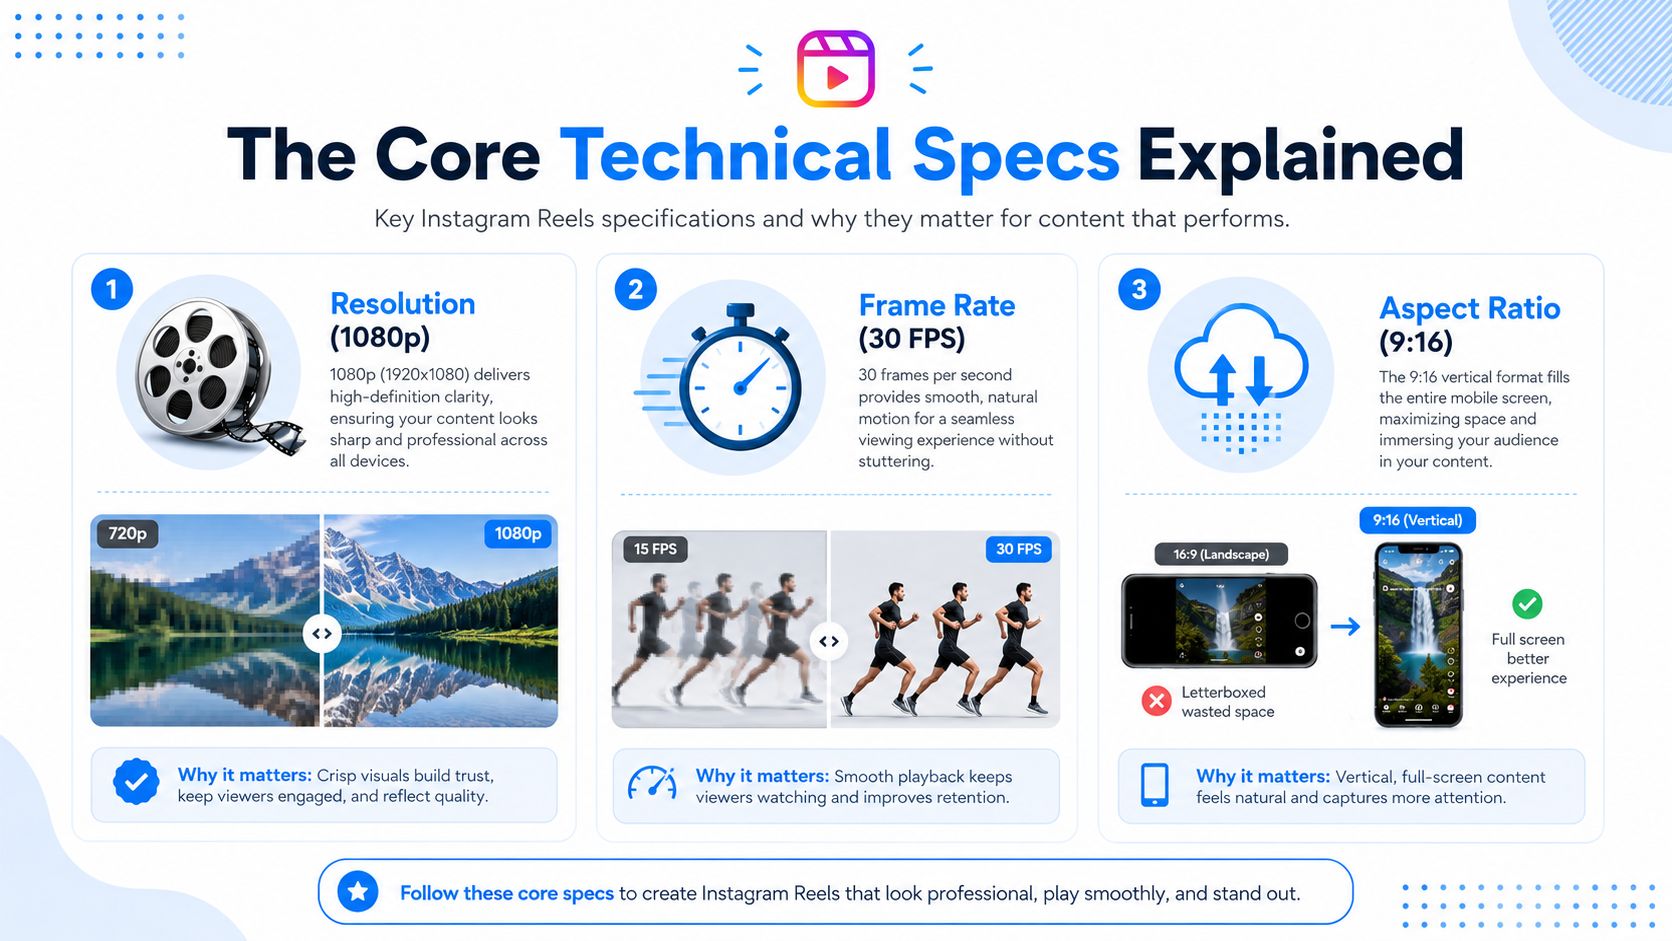
Reels are designed for a vertical 9:16 frame, and 1080 × 1920 remains the working standard because it fills the screen cleanly and gives Instagram less reason to reinterpret your file.
That last part matters more than many guides admit.
Every time the platform has to resize, pad, or reframe your upload, you lose control over sharpness and composition. A horizontal clip inside a vertical canvas can work as a stylistic choice, but it usually reads like repurposed footage. A square video has the same problem. If the goal is native-looking playback, full-screen vertical is the safer setup.
For a closer look at how pixel dimensions affect sharpness after upload, Mastering Instagram Reel resolution is a useful companion read.
Resolution, frame rate, and file type
Resolution controls image detail. Frame rate controls motion feel. The container controls how reliably the file survives the trip from editor to Instagram.
Those three settings work together.
- 1080 × 1920 is the standard target for full-screen Reels.
- 30 FPS fits most talking-head videos, tutorials, voiceovers, and simple edits.
- 60 FPS holds up better for fast movement, handheld product shots, action clips, and speed-ramped sequences.
- MP4 is the safest default for export and upload consistency.
- MOV can still work, but it introduces more chances for mismatch between editing software, compression, and upload behavior.
A common mistake is fixing quality problems in the wrong place. Creators often blame Instagram when the issue started with mismatched source clips, an over-compressed export, or a frame rate change introduced on the timeline.
Specs are only useful if they match the footage
Footage shot at 30 FPS should usually stay at 30 FPS. Footage shot at 60 FPS should usually stay at 60 FPS unless you are converting it intentionally for a specific look. Mixing frame rates in one Reel is possible, but it raises the odds of stutter, ghosting, or uneven motion once the final file gets compressed again by the platform.
The same rule applies to resolution. Upscaling a weak source file to 1080 × 1920 does not create detail. It just gives Instagram a larger low-quality file to compress.
If you want a practical breakdown of preparing files before export, this guide on formatting video for Instagram connects the technical settings to real publishing decisions.
Length changes the edit, not just the runtime
Current Reel length limits vary by publishing method, and that affects workflow more than creators expect. A short Reel can survive on a fast hook and tight pacing. A longer Reel needs cleaner structure, wider spacing between visual beats, and more discipline around text density.
That is why this article treats specs as part of a full workflow, not a checklist of numbers. The file settings need to support the edit, and the edit needs to survive Instagram's compression without losing readability or motion quality.
A Reel usually looks bad after upload for predictable reasons. Wrong frame shape, weak source footage, mismatched frame rate, or export settings that leave too much work for Instagram.
Mastering Instagram Reels Safe Zones
A lot of creators get the file specs right and still publish a bad-looking Reel. The problem is usually the interface, not the footage.
Where things get covered
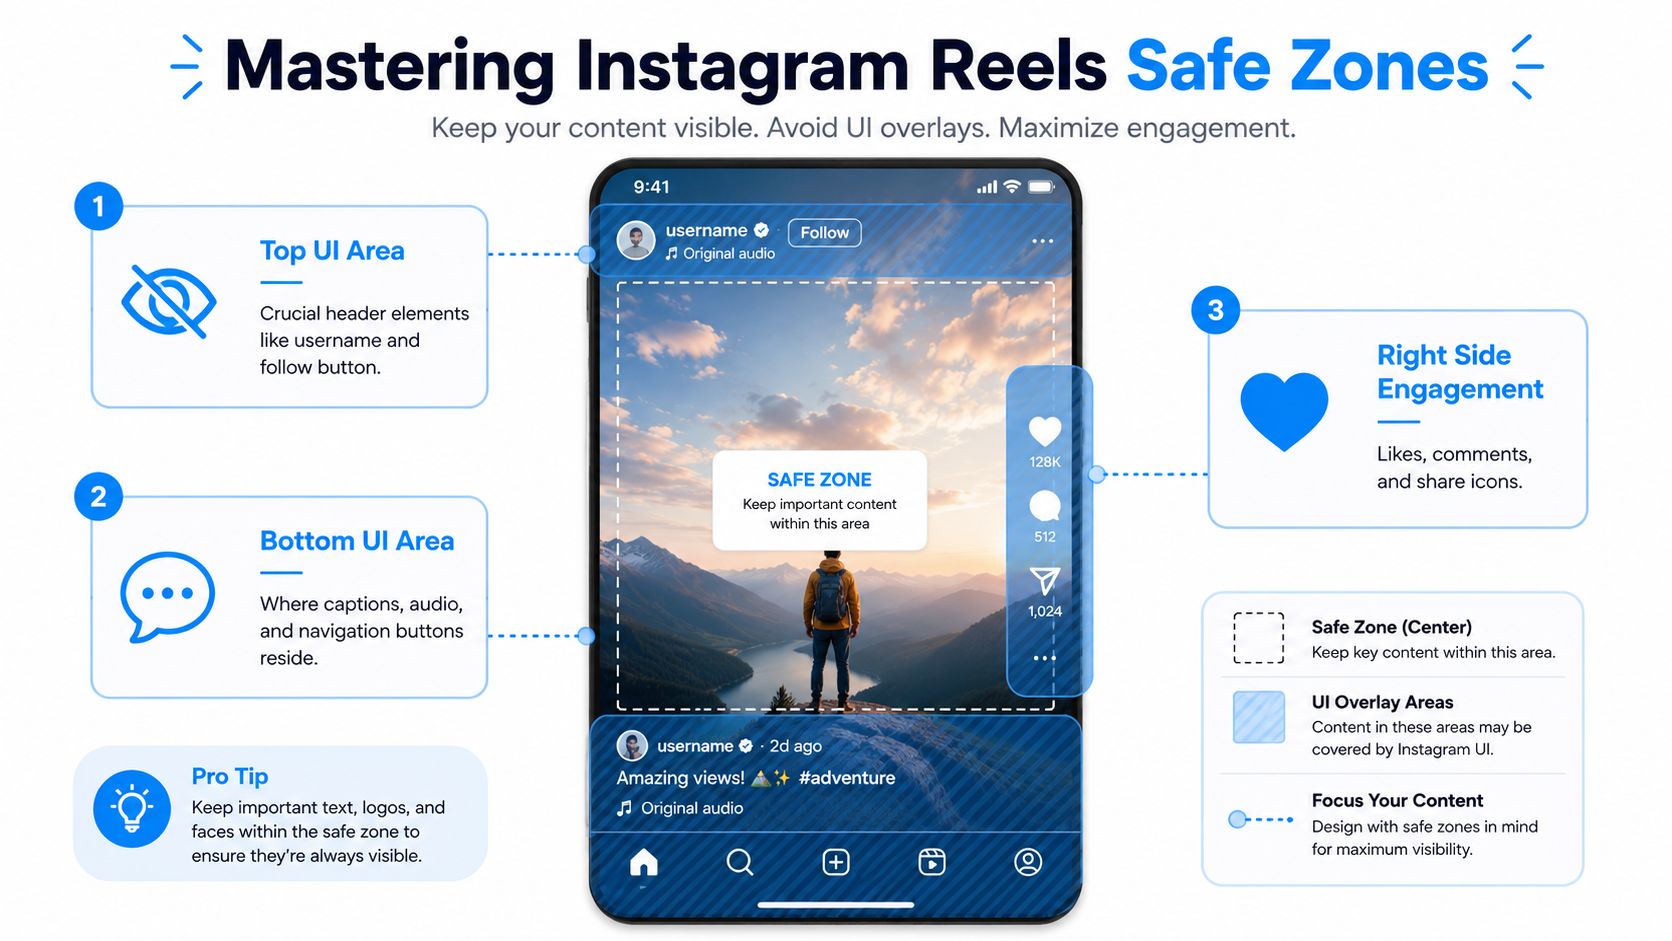
Instagram layers interface elements over your video. That means parts of the screen are functionally unsafe for important text, subtitles, product labels, or callouts.
Watch these zones closely:
- Top area: Username and account elements can compete with titles or opening text.
- Right side: Like, comment, share, and other engagement icons can block vertical text stacks or product details.
- Bottom area: Captions, audio labels, and navigation overlays can cover subtitles, CTAs, and lower-third graphics.
The biggest mistake is putting your most important text near the bottom because it looks balanced in the editor. Once posted, that same text can become partially unreadable.
A safer composition habit
Build your Reel with a centered content block. Keep the key action, headline text, and primary subject away from the edges. This matters even more if you use auto-captions or animated text callouts.
A simple workflow that avoids most safe-zone errors:
- Place the subject first: Make sure the face, product, or main object reads clearly from the center.
- Add text second: Keep titles and subtitle lines inside a comfortably centered area, not touching top or bottom margins.
- Preview like a user: Scrub through the video and imagine interface overlays on top of it.
- Check the first frame: If the hook text gets covered, retention drops before the Reel even gets a fair shot.
If a viewer has to tilt their attention around buttons and captions to understand your point, you've already added friction.
Why this affects retention
Safe zones are not just a design detail. They shape clarity.
When text gets covered, your hook weakens. When a product label is hidden, the demo loses context. When subtitles collide with Instagram's caption area, viewers stop reading. Professional-looking Reels usually feel cleaner because the creator made deliberate room for the platform itself.
Optimal Export Settings for High-Quality Reels
Export is where many good edits get damaged. The timeline can look excellent, but a poor export choice introduces softness, banding, or audio issues before Instagram even touches the file.
Premiere Pro, Resolve, and Final Cut settings
Across Adobe Premiere Pro, DaVinci Resolve, and Final Cut Pro, the goal is the same. Export a clean vertical master in a format Instagram handles well, without making the file unnecessarily heavy.
Use this baseline:
| Setting | Practical choice |
|---|---|
| Frame size | 1080 × 1920 |
| Aspect ratio | 9:16 |
| Container | MP4 |
| Alternate container | MOV |
| Frame rate | Match sequence, usually 30 FPS or 60 FPS |
| Audio | AAC if available in your export workflow |
| Render quality | Highest practical setting without odd upscaling |
| Color check | Review on phone before publishing |
In practice:
- Premiere Pro: H.264 in an MP4 wrapper is the standard starting point. Match source frame rate unless the source itself is inconsistent.
- DaVinci Resolve: Use a vertical timeline from the start, then export to MP4 with frame rate locked to your sequence.
- Final Cut Pro: Avoid casual preset use without checking dimensions. Some exports preserve content but mismatch the final frame shape.
What usually goes wrong
Three export mistakes show up constantly.
- Wrong sequence size: Editing in horizontal and reframing later often leads to awkward crops.
- Mixed frame rates: A sequence built from mismatched clips can feel jittery if you don't normalize playback.
- Overprocessed output: Heavy sharpening, noisy footage, or repeated exports create compression artifacts fast.
If you need a plain-English breakdown of which file formats Instagram handles most predictably, this guide to video file types for Instagram is worth bookmarking.
A faster workflow when you don't want to hand-tune every export
Some creators want full manual control. Others just need a Reel exported correctly and posted without checking ten settings every time. In that case, tools that automate the formatting layer can save time.
Aicut is one option for that kind of workflow. It's an AI video creation and automation platform for short-form content that handles formatting and encoding in the background while you work from templates, generated footage, or reused content. That's useful when the bottleneck isn't editing skill, but the repetition of exporting and packaging vertical videos over and over.
Here's a walkthrough if you want to see that style of workflow in action:
The phone preview test
Before you upload, send the export to your phone and watch it natively.
Check for:
- Text sharpness: Thin fonts reveal compression problems quickly.
- Skin and gradients: Banding and blotchy shadows show up here first.
- Audio sync: Mouth movement and captions should align cleanly.
- Edge clutter: Anything near the border deserves one last look.
That last preview catches mistakes faster than any desktop monitor.
Optimizing Your Thumbnail Cover and Caption
The Instagram Reels format doesn't end at the video file. The cover and caption affect whether someone taps, watches, understands, and acts.
Cover choices that still read on the grid
A Reel can look strong in full-screen view and weak on your profile if the cover wasn't designed with the grid in mind. The usual problem is over-detail. Small text, busy backgrounds, or off-center framing make the cover unreadable at a glance.
A better approach:
- Use a clear focal point: One face, one product, or one strong visual idea.
- Keep title text simple: Short words hold up better than sentence-length overlays.
- Center the important elements: Covers get previewed in tighter contexts, so edge details often lose value.
- Choose a frame on purpose: Don't let Instagram auto-pick a random expression or motion blur frame.
Caption structure that supports the Reel
Captions work best when they extend the video instead of repeating it. If the Reel already explains the main point, the caption should add context, a next step, or a prompt.
A simple working structure looks like this:
- Open with the point: State what the viewer gets.
- Add one useful detail: Clarify the promise or outcome.
- Close with a direct action: Comment, save, message, or click.
If your goal is lead capture rather than pure views, this guide for effective Instagram leads gives practical ideas for turning attention into a response without making the caption feel forced.
Hashtags and CTA placement
Hashtags still matter most when they support context instead of stuffing the caption. Keep them relevant to the actual content, niche, or audience. Random broad tags usually add noise.
Put the CTA before the caption gets visually buried. If your key action sits too low or after too much filler, fewer viewers will see it. This is one reason creators working on discoverability spend time on packaging, not just editing. This breakdown of how to get more views on Instagram Reels is helpful if you want to tighten that side of the workflow.
Your cover gets the click. Your caption explains the value. They do different jobs, so don't make either one carry the whole post.
Common Instagram Reels Format Mistakes to Avoid
A Reel can look sharp in your editor, then lose impact the moment it hits Instagram. Usually the problem started earlier in the workflow. The edit was built without enough room for captions, exported one too many times, or framed for a different screen and forced into vertical later.
That is why format mistakes are expensive. They rarely show up as one obvious failure. They show up as soft footage, awkward crops, hidden text, and lower watch time.
Mistake one: treating vertical as an afterthought
Reels work best when vertical framing is decided before you shoot. If the original plan was horizontal or “we'll crop it later,” the compromises stack up fast. Faces sit too high, hands get cut off, product demos lose detail, and text placement turns into cleanup work.
Build for 9:16 from the first frame. That gives you cleaner composition, more usable negative space, and fewer rescue edits at export.
Mistake two: blaming Instagram for every blurry upload
Instagram compression is real. Bad source handling makes it worse.
The usual culprits are avoidable: multiple exports, footage pulled from old drafts, low-quality screen recordings, heavy sharpening, and noisy low-light clips. Each one gives the platform less clean data to work with, so artifacts show up faster after upload.
Use a simple rule. Export from the original timeline whenever possible.
A few habits prevent a lot of damage:
- Keep the edit chain short: Every extra render can soften detail.
- Avoid tiny text and thin graphic elements: Compression tends to break fine edges first.
- Control noise before export: Grain and underexposure often turn into muddy motion once uploaded.
- Check the final file on a phone: Desktop preview hides softness that becomes obvious on mobile.
Mistake three: following the specs and ignoring the shot
A Reel can meet every technical requirement and still feel flat. The file is correct. The viewing experience is weak.
Creators often stop at 9:16 / 1080×1920, then wonder why retention drops. Framing, camera distance, subject movement, and pacing do as much work as the export settings. As noted in Birdeye's discussion of Instagram Reel size, longer Reels have pushed creators to think beyond raw aspect-ratio compliance and pay more attention to structure inside the frame.
That shift is easy to see in the feed. Static framing drags. Unclear focal points make viewers work too hard. A small angle change, a punch-in, or a reset in composition often fixes more than another round of technical tweaking.
Format gets the Reel published correctly. Framing and pacing help it hold attention.
Mistake four: forgetting that Instagram's interface changes the composition
A clean edit can still fail on-platform if the layout ignores overlays. Subtitles placed too low get covered. A call to action near the bottom competes with interface elements. Product details on the right side can sit behind the icon stack.
This is one of the mistakes basic guides skip. The video file can be perfectly exported and still be poorly formatted for actual viewing. Safe zone mistakes are format mistakes because they change what the viewer can read and act on.
Mistake five: using the same editing rhythm for every Reel length
Short Reels can survive on one visual idea and quick cuts. Longer Reels need more structure. You need clearer segment breaks, more deliberate pattern resets, and enough visual change to keep the next point feeling earned.
If a longer Reel feels slow, duration is usually not the whole issue. The core issue is repetition. Same angle, same crop, same cadence.
Good formatting supports editing rhythm. It gives you room for text, room for reframing, and room to change the visual pace without the whole Reel starting to feel cramped or unstable.
Your Final Pre-Publish Checklist for Reels
You export the Reel, it looks sharp in the editor, and the caption is ready. Then it goes live and the cover crops badly, the first subtitle sits under the interface, or the upload comes back softer than the original file. That is why the last review matters. Format mistakes usually happen in the final two minutes, not during the edit.
Run this before every upload
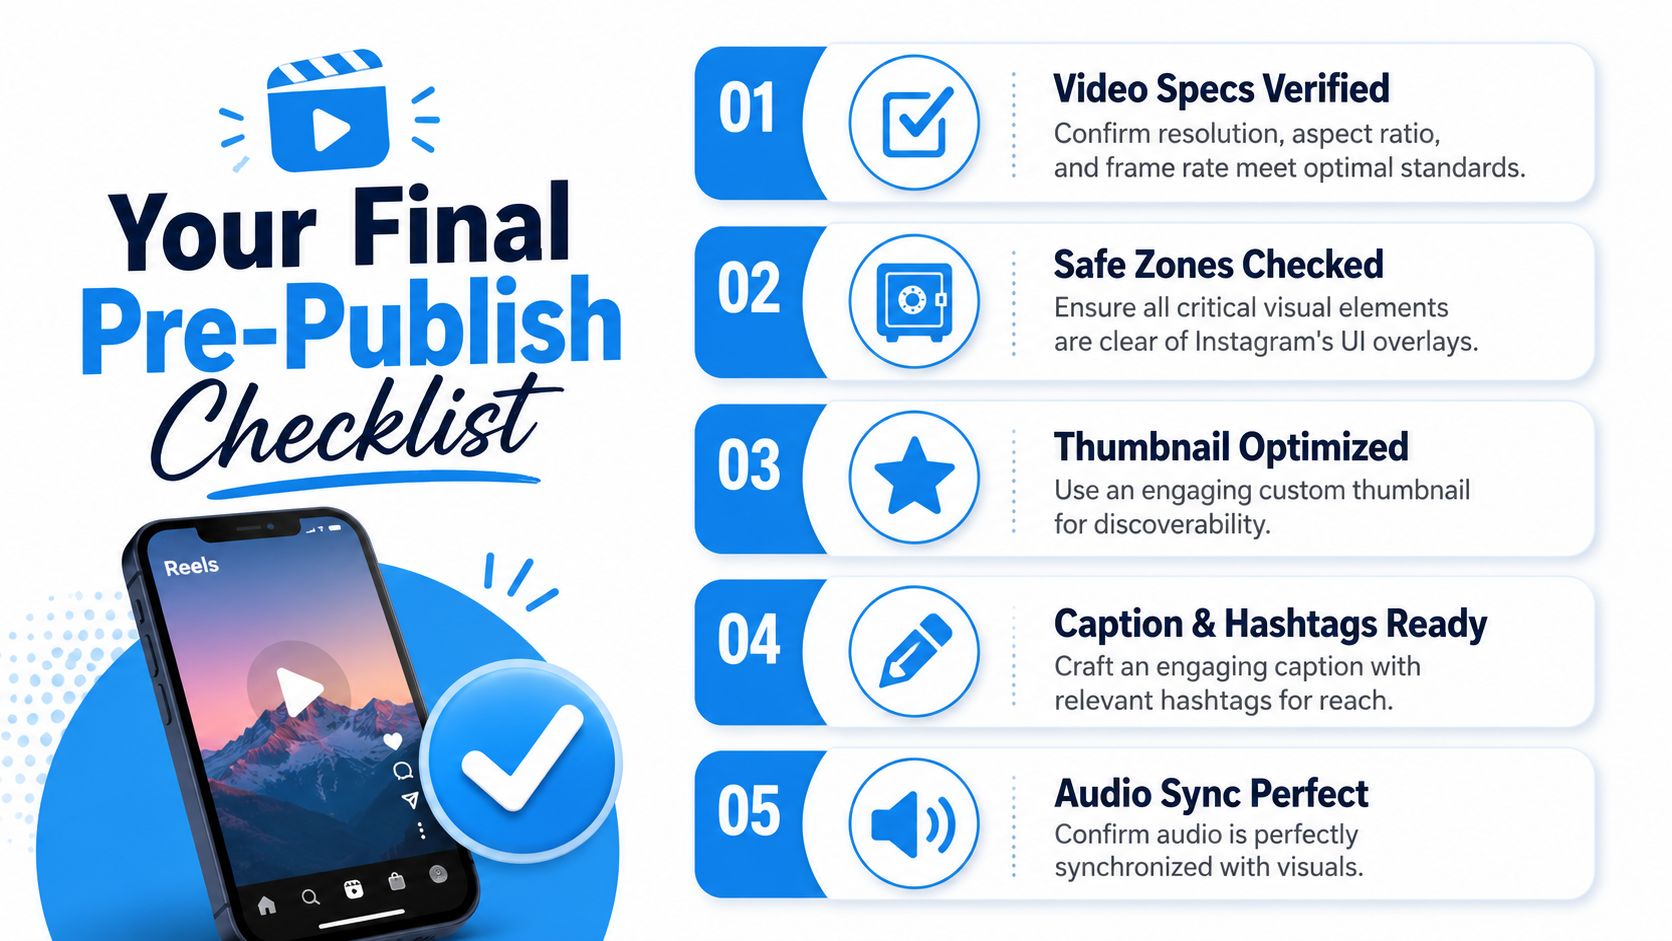
- Specs match the platform: Check that the file is vertical, full-screen, and exported in the version you meant to publish.
- The frame holds up on a phone: Preview on an actual device if possible. Desktop playback misses crop and readability problems.
- Safe zones are clear: Keep subtitles, offers, labels, and calls to action away from interface-heavy areas.
- The first frame reads instantly: The opening visual should make sense before the viewer hears a word.
- The cover still works in the grid: Test it small. If the subject, headline, or product disappears, replace it.
- The caption has one job: Add context, drive a click, or support the offer. Cut anything that delays the point.
- Audio feels intentional: Check sync, cut points, music level, and voice clarity before upload.
- Compression has not damaged the image: Look closely at text edges, skin tones, and darker scenes where artifacts show up first.
- Length fits the idea: Keep short points short. If the Reel runs longer, each section needs a clear reason to stay.
- Publish path is correct: Scheduler settings, API tools, cross-post workflows, and in-app uploads can all handle files a little differently.
One last judgment call
Ask a simple question before you post: does this look like it was built for Instagram, or just resized for it?
That standard catches mistakes checklists miss. A Reel can meet the technical spec and still feel off if the cover is weak, the pacing stalls, or key text sits too close to the edges. If you use synthetic clips or faster production systems, this guide to AI video generation for social media is a useful reference for how those workflows fit into short-form publishing.
A Reel does not need expensive production. It needs clear formatting, clean export choices, and a final review that catches the small mistakes viewers notice immediately.
If you want a faster way to turn ideas, prompts, blogs, or source clips into correctly formatted short-form videos, Aicut is built for that workflow. It helps creators generate and package faceless videos for Instagram, TikTok, and YouTube without manually rebuilding the same export process every time.